
Material in ComfyTV
What this node does
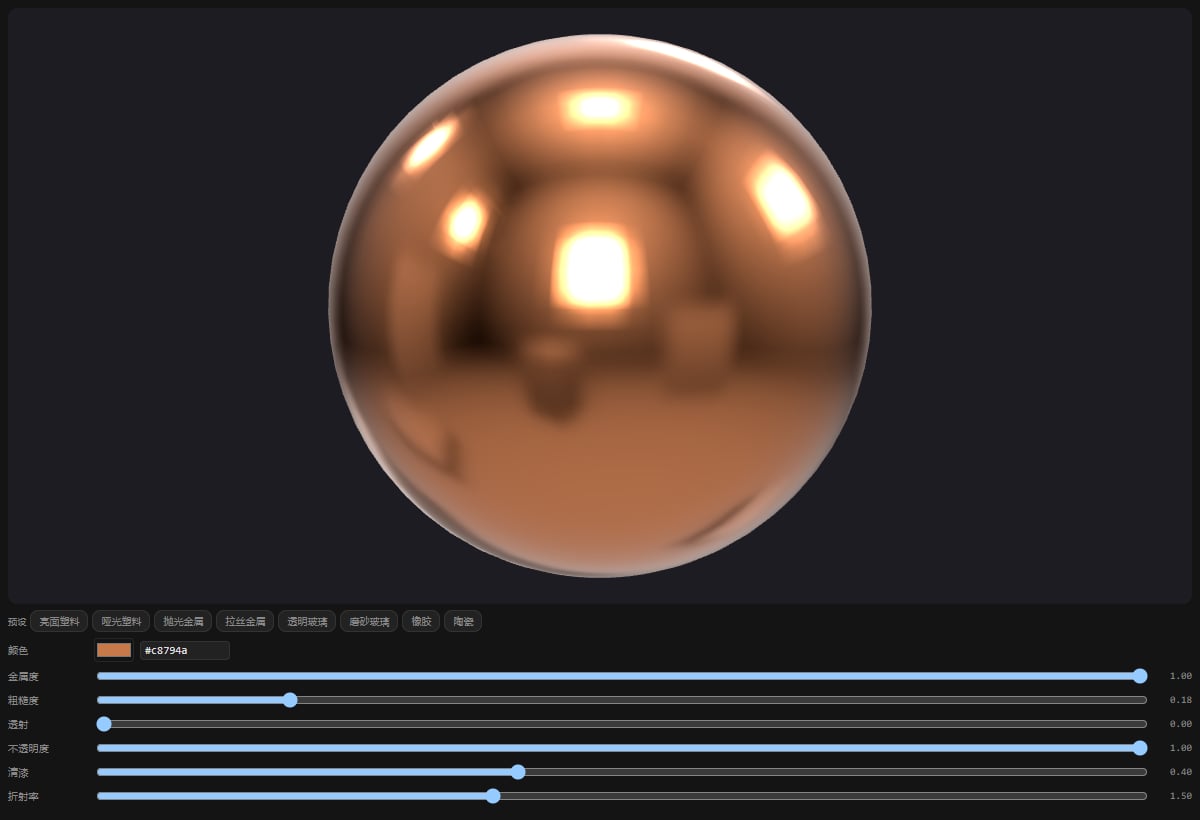
Material is a small material-authoring studio. You edit a live physically-based (PBR) material on a rotating preview sphere — pick a base color, drag sliders for metalness, roughness, transmission and more, or start from a preset like Polished metal or Clear glass. The sphere re-renders instantly as you tweak, and a snapshot of it is auto-captured as an image output. Everything happens browser-side and updates live; there is no ▶ Run needed just to author a material. The exception is the image input: if you connect a reference image, running the node sends it to a VLM (vision) workflow that estimates PBR parameters from the photo and merges them into your material — a quick way to match a real surface. The node produces two outputs: aCOMFYTV_MATERIAL you can bind to model parts elsewhere, and a COMFYTV_IMAGE snapshot of the ball for previews and thumbnails.
When to use it
- Author a reusable PBR material (chrome, frosted glass, matte rubber, glazed ceramic) to bind onto an imported model’s parts.
- Quickly estimate a material from a reference photo via a VLM workflow, then hand-tune it.
- Build a small library of look presets to keep surfaces consistent across a project.
- Produce a clean material-ball thumbnail for documentation or comparison.
The editor
The node is a stacked panel, top to bottom: Preview sphere. A live WebGL material ball fills the top of the node. It re-renders on every change; shortly after you stop editing, a snapshot is captured and uploaded as theimage output automatically (no button to press).
Preset row. A row of one-click chips that load a full look. The built-in presets are:
- Glossy plastic — low roughness with a clearcoat.
- Matte plastic — high roughness, no coat.
- Polished metal — full metalness, near-mirror roughness.
- Brushed metal — full metalness, medium roughness.
- Clear glass — very low roughness, full transmission.
- Frosted glass — mid roughness, full transmission.
- Rubber — very high roughness.
- Ceramic — glazed clearcoat over a smooth base.
- metalness — 0–1. How metallic the surface reads (0 = dielectric/plastic, 1 = metal).
- roughness — 0–1. Microsurface roughness; low is mirror-sharp, high is diffuse.
- transmission — 0–1. See-through refraction; raise it for glass and liquids.
- opacity — 0–1. Overall alpha of the surface.
- clearcoat — 0–1. A glossy lacquer layer on top (car paint, ceramic glaze).
- ior — 1–2.333. Index of refraction, driving how strongly transmission bends light (≈1.5 for glass).
clearcoatRoughness, emissive color and emissiveIntensity; these are part of the stored material and are set by presets and the VLM estimate, though the panel’s direct controls are the color plus the six sliders above.
Workflow / step by step
- Add a Project node, then Add Node → ComfyTV → Input → Material.
- Click a preset chip (e.g. Polished metal) to get in the ballpark.
- Set the color swatch to your base tint.
- Fine-tune with the roughness, metalness, clearcoat and other sliders while watching the sphere.
- The snapshot uploads on its own — the image output updates a moment after you stop dragging.
- Wire material into a model/part-binding node to apply the look; use image as a thumbnail.
Inputs and outputs
The live material and the captured snapshot are stored internally and driven by the editor, not by exposed widgets.
COMFYTV_* outputs are project references, not native ComfyUI tensors. To use the snapshot with native nodes, add a Bridge — see the bridges guide.
Tips
- You don’t need to Run just to author a material — sliders and the snapshot update live. Run is only for the image-input VLM estimate.
- Presets overwrite the sliders but preserve your color, so pick a preset first, then set the color.
- For believable glass, pair high transmission with low roughness and an ior near 1.5; frosted glass is the same but with mid roughness.
- clearcoat sits on top of the base — great for car paint and ceramic glaze without changing the underlying metalness/roughness.
- The snapshot is captured a short moment after your last edit, so let the sphere settle before wiring the image downstream.
Related nodes
- Model Loader / part-material binding — apply the
COMFYTV_MATERIALonto a model’s parts. - 3D Scene — stage and shoot the model the material is applied to.
- Image Stage — a reference photo source for the VLM estimate.
- Bridge → / ← ComfyTV Image — convert the snapshot to/from native ComfyUI tensors.