> ## Documentation Index
> Fetch the complete documentation index at: https://comfytv.org/llms.txt
> Use this file to discover all available pages before exploring further.
# 3D Scene
> A DCC-style 3D workbench inside a node: build a scene from characters, primitives, imported models, lights and cameras, then capture a still, a multi-camera batch, or record a video — in color, depth, normal, or OpenPose channels.
 ## What this node does
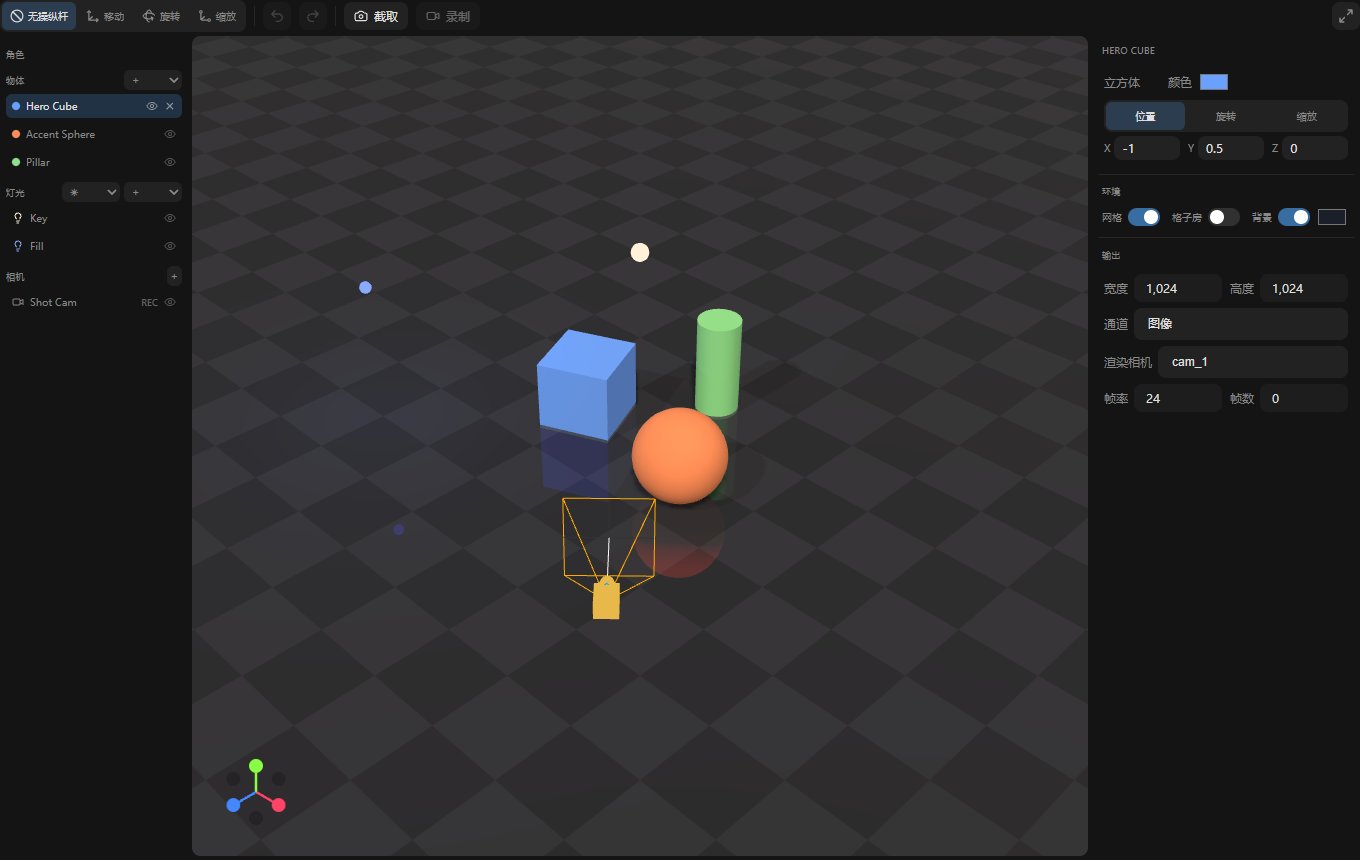
**3D Scene** is a full in-browser 3D staging tool. You assemble a scene in a live WebGL viewport — drop in animated characters, geometry primitives, your own imported models, lights and cameras — pose everything with move/rotate/scale gizmos, then use the toolbar to **Capture** a frame or **Record** a clip. What you shoot becomes the node's project snapshots.
It is not a text-to-3D generator; it is a *set* you dress and shoot. The viewport shares ComfyTV's single WebGL renderer with the other 3D nodes, so it stays light even with several scenes on the canvas.
Everything a creator does lives in three outputs: the picked still **image**, the recorded **video**, and the multi-camera **images** batch. All the geometry, camera and output settings are stored internally as scene state JSON; there are no exposed number widgets — you drive it all through the editor UI.
## When to use it
* Set up a controllable 3D reference (character + camera angle) to feed a ControlNet-style image/video workflow via the depth, normal, or OpenPose channels.
* Block out a shot with multiple cameras and render one clean pass per camera in a single **Capture**.
* Animate a character clip along a camera path and **Record** a short driving video for I2V/V2V.
* Compose props and lights to art-direct lighting or silhouette before generating.
## The editor
The node is a three-column workbench with a toolbar on top and an optional timeline strip below.
**Top toolbar (left to right):**
* **Gizmo modes** — None, Translate, Rotate, Scale. Pick one and drag the on-screen gizmo to transform the selected object. Modes gray out when they don't apply to the current selection.
* **Undo / Redo** — full history of scene edits.
* **Capture** — renders the current frame (in the selected channel) and uploads it as the still `image`. If the scene has more than one camera, it also produces the `images` batch, one entry per camera.
* **Record** — captures an animated clip to the `video` output. Enabled only when the scene has a recordable duration (an animated character or a moving camera) and the browser supports recording.
* **Fullscreen** — pops the editor out to fill the screen (Esc to exit).
**Left column — the outliner.** Grouped "add" rows let you populate the scene, and each added object gets a row you can select, rename, hide (eye toggle) or delete:
* **Add Character** — pick from the available rigged model library; characters carry animation clips.
* **Add Object** — primitives: `cube`, `sphere`, `cylinder`, `plane` (each has an editable color).
* **Add Model** — insert one of your imported/uploaded GLB model assets.
* **Add Light** — `directional`, `point`, or `spot`, plus a lighting-preset dropdown (e.g. three-point rigs) that populates a whole setup at once.
* **Add Camera** — adds a scene camera. The camera currently chosen for output is tagged **REC** in the list.
**Center — the viewport.** A live 3D view with orbit navigation. Selecting an object shows its gizmo. A camera can be **looked through** (eye button) to frame the shot from its lens; a second camera can be pinned as a small picture-in-picture preview in the corner.
**Right column — the inspector**, which changes with the selection:
* **Character / Model panel** — choose an animation clip, set speed, start offset and loop, and edit position/rotation/scale. Models add a **Fit to scene** button.
* **Primitive panel** — color plus transform.
* **Light panel** — color, intensity, and light-type-specific settings (range, cone angles).
* **Camera panel** — bind a **camera preset** (a canned move) or stay a free camera; free cameras expose a **FOV** slider (10–140°) and position/rotation; preset cameras expose tuning sliders, an X/Y/Z position **offset**, a **reverse** toggle and **Reset**. An eye button looks through the camera.
Below the inspector are always-on sections: **Environment** (show grid, show room, background color) and **Output**.
**Output panel:** width and height (64–4096, step 8), the **Channel** dropdown, an **Output Camera** picker (shown when there is more than one camera), plus **FPS** and **Frame count** for recording.
**Timeline strip (bottom):** appears when the scene has animated cameras or characters. It shows per-object tracks, a play/scrub head, a loop toggle, and lets you retime camera speed and character animation directly.
### The four capture channels
The **Channel** dropdown selects what the render passes emit — the same for Capture and Record:
* **color** — the normal lit beauty render.
* **depth** — a normalized grayscale depth map (near = bright), ready as a depth condition.
* **normal** — a surface-normal map (the classic blue/purple normal render).
* **openpose** — an OpenPose skeleton overlay projected from each character's rig, for pose-conditioned generation.
## Workflow / step by step
1. Add a **Project** node, then **Add Node → ComfyTV → Input → 3D Scene**.
2. From **Add Character** (or **Add Model**) drop in a figure; from **Add Light** apply a lighting preset.
3. Orbit the viewport to frame the shot, or **Add Camera**, select it, and **look through** it.
4. In the inspector, set the character's animation clip, speed and loop.
5. In **Output**, set width/height and pick a **Channel** (e.g. `depth` for a depth condition).
6. Click **Capture** for a still, or set **FPS**/**Frame count** and click **Record** for a clip.
7. Feed **image** / **video** / **images** downstream — insert a **Bridge** to convert to native ComfyUI tensors for a ControlNet workflow.
## Inputs and outputs
The node has no user-facing input widgets — the scene, channel, size and captured media are all stored internally and driven by the editor. Its outputs are project snapshots:
| Output | Type | Meaning |
| ---------- | ---------------- | --------------------------------------------------------------------------------------------------------- |
| **image** | `COMFYTV_IMAGE` | The last **Capture** still (in the selected channel). |
| **video** | `COMFYTV_VIDEO` | The last **Record** clip. |
| **images** | `COMFYTV_IMAGES` | Multi-camera batch from a Capture — one image per scene camera (only when there is more than one camera). |
`COMFYTV_*` outputs are project references, not native ComfyUI tensors. To wire them into native nodes (ControlNet, etc.), add a **Bridge** — see the [bridges guide](https://github.com/jtydhr88/ComfyTV/blob/main/docs/bridges.md).
## Tips
* **Record** is disabled until something in the scene actually animates (a playing clip or a moving/preset camera) — add motion first.
* The **images** batch only appears when you have two or more cameras; with a single camera, use **image**.
* Use **look through** on a camera before capturing so the framing you shoot matches the framing you see.
* `depth`, `normal` and `openpose` are meant as conditioning maps — pair them with a matching ControlNet in the downstream workflow.
* The viewport shares one WebGL context across all 3D nodes; if a scene looks blank after heavy canvas edits, re-select an object to force a redraw.
## Related nodes
* **Model 3D / Model Loader** — prepare a `COMFYTV_MODEL` GLB to bring in via **Add Model**.
* **Material** — author a PBR material to apply to imported parts.
* **Bridge → / ← ComfyTV Image/Video** — convert captures to and from native ComfyUI tensors for ControlNet.
* **Image / Video Stage** — consume the captured stills or clips as generation conditions.
## What this node does
**3D Scene** is a full in-browser 3D staging tool. You assemble a scene in a live WebGL viewport — drop in animated characters, geometry primitives, your own imported models, lights and cameras — pose everything with move/rotate/scale gizmos, then use the toolbar to **Capture** a frame or **Record** a clip. What you shoot becomes the node's project snapshots.
It is not a text-to-3D generator; it is a *set* you dress and shoot. The viewport shares ComfyTV's single WebGL renderer with the other 3D nodes, so it stays light even with several scenes on the canvas.
Everything a creator does lives in three outputs: the picked still **image**, the recorded **video**, and the multi-camera **images** batch. All the geometry, camera and output settings are stored internally as scene state JSON; there are no exposed number widgets — you drive it all through the editor UI.
## When to use it
* Set up a controllable 3D reference (character + camera angle) to feed a ControlNet-style image/video workflow via the depth, normal, or OpenPose channels.
* Block out a shot with multiple cameras and render one clean pass per camera in a single **Capture**.
* Animate a character clip along a camera path and **Record** a short driving video for I2V/V2V.
* Compose props and lights to art-direct lighting or silhouette before generating.
## The editor
The node is a three-column workbench with a toolbar on top and an optional timeline strip below.
**Top toolbar (left to right):**
* **Gizmo modes** — None, Translate, Rotate, Scale. Pick one and drag the on-screen gizmo to transform the selected object. Modes gray out when they don't apply to the current selection.
* **Undo / Redo** — full history of scene edits.
* **Capture** — renders the current frame (in the selected channel) and uploads it as the still `image`. If the scene has more than one camera, it also produces the `images` batch, one entry per camera.
* **Record** — captures an animated clip to the `video` output. Enabled only when the scene has a recordable duration (an animated character or a moving camera) and the browser supports recording.
* **Fullscreen** — pops the editor out to fill the screen (Esc to exit).
**Left column — the outliner.** Grouped "add" rows let you populate the scene, and each added object gets a row you can select, rename, hide (eye toggle) or delete:
* **Add Character** — pick from the available rigged model library; characters carry animation clips.
* **Add Object** — primitives: `cube`, `sphere`, `cylinder`, `plane` (each has an editable color).
* **Add Model** — insert one of your imported/uploaded GLB model assets.
* **Add Light** — `directional`, `point`, or `spot`, plus a lighting-preset dropdown (e.g. three-point rigs) that populates a whole setup at once.
* **Add Camera** — adds a scene camera. The camera currently chosen for output is tagged **REC** in the list.
**Center — the viewport.** A live 3D view with orbit navigation. Selecting an object shows its gizmo. A camera can be **looked through** (eye button) to frame the shot from its lens; a second camera can be pinned as a small picture-in-picture preview in the corner.
**Right column — the inspector**, which changes with the selection:
* **Character / Model panel** — choose an animation clip, set speed, start offset and loop, and edit position/rotation/scale. Models add a **Fit to scene** button.
* **Primitive panel** — color plus transform.
* **Light panel** — color, intensity, and light-type-specific settings (range, cone angles).
* **Camera panel** — bind a **camera preset** (a canned move) or stay a free camera; free cameras expose a **FOV** slider (10–140°) and position/rotation; preset cameras expose tuning sliders, an X/Y/Z position **offset**, a **reverse** toggle and **Reset**. An eye button looks through the camera.
Below the inspector are always-on sections: **Environment** (show grid, show room, background color) and **Output**.
**Output panel:** width and height (64–4096, step 8), the **Channel** dropdown, an **Output Camera** picker (shown when there is more than one camera), plus **FPS** and **Frame count** for recording.
**Timeline strip (bottom):** appears when the scene has animated cameras or characters. It shows per-object tracks, a play/scrub head, a loop toggle, and lets you retime camera speed and character animation directly.
### The four capture channels
The **Channel** dropdown selects what the render passes emit — the same for Capture and Record:
* **color** — the normal lit beauty render.
* **depth** — a normalized grayscale depth map (near = bright), ready as a depth condition.
* **normal** — a surface-normal map (the classic blue/purple normal render).
* **openpose** — an OpenPose skeleton overlay projected from each character's rig, for pose-conditioned generation.
## Workflow / step by step
1. Add a **Project** node, then **Add Node → ComfyTV → Input → 3D Scene**.
2. From **Add Character** (or **Add Model**) drop in a figure; from **Add Light** apply a lighting preset.
3. Orbit the viewport to frame the shot, or **Add Camera**, select it, and **look through** it.
4. In the inspector, set the character's animation clip, speed and loop.
5. In **Output**, set width/height and pick a **Channel** (e.g. `depth` for a depth condition).
6. Click **Capture** for a still, or set **FPS**/**Frame count** and click **Record** for a clip.
7. Feed **image** / **video** / **images** downstream — insert a **Bridge** to convert to native ComfyUI tensors for a ControlNet workflow.
## Inputs and outputs
The node has no user-facing input widgets — the scene, channel, size and captured media are all stored internally and driven by the editor. Its outputs are project snapshots:
| Output | Type | Meaning |
| ---------- | ---------------- | --------------------------------------------------------------------------------------------------------- |
| **image** | `COMFYTV_IMAGE` | The last **Capture** still (in the selected channel). |
| **video** | `COMFYTV_VIDEO` | The last **Record** clip. |
| **images** | `COMFYTV_IMAGES` | Multi-camera batch from a Capture — one image per scene camera (only when there is more than one camera). |
`COMFYTV_*` outputs are project references, not native ComfyUI tensors. To wire them into native nodes (ControlNet, etc.), add a **Bridge** — see the [bridges guide](https://github.com/jtydhr88/ComfyTV/blob/main/docs/bridges.md).
## Tips
* **Record** is disabled until something in the scene actually animates (a playing clip or a moving/preset camera) — add motion first.
* The **images** batch only appears when you have two or more cameras; with a single camera, use **image**.
* Use **look through** on a camera before capturing so the framing you shoot matches the framing you see.
* `depth`, `normal` and `openpose` are meant as conditioning maps — pair them with a matching ControlNet in the downstream workflow.
* The viewport shares one WebGL context across all 3D nodes; if a scene looks blank after heavy canvas edits, re-select an object to force a redraw.
## Related nodes
* **Model 3D / Model Loader** — prepare a `COMFYTV_MODEL` GLB to bring in via **Add Model**.
* **Material** — author a PBR material to apply to imported parts.
* **Bridge → / ← ComfyTV Image/Video** — convert captures to and from native ComfyUI tensors for ControlNet.
* **Image / Video Stage** — consume the captured stills or clips as generation conditions.